
TIL:08: Build your own React
I use React almost every day as a developer. And yet, when someone asks "what exactly happens when you call setState?", the best I could manage was something like "reconciliation kicks in... and it diffs the virtual DOM...". Nearly ten years with a tool, and my grasp of its internals was purely abstract. This post is a record of clearing that up over a two-day weekend.
1. Build your own X
One day, while wandering around a developer community, I stumbled across a repo called build-your-own-x. It's a collection of tutorial links for building things like Git, Docker, databases, and operating systems yourself. Thirty categories alone — my interest was piqued, but I had no idea where to start.
So I just handed the repo link to Claude. Plenty of work conversations had piled up over time, so Claude knows what I do — I figured I'd get a recommendation out of it. It came back with three. RAG from scratch, since I'm building a document search feature at work; Build your own React, since I'm in a frontend monorepo every day; and Git internals, since I've been doing tooling automation.
All three were tempting, but I picked React. Simple reason: it's the tool I use every day and understand the least on the inside. The material was Rodrigo Pombo's Build your own React. In roughly 300 lines of code, you build a miniature React (Didact) across eight steps, from createElement to useState.
I planned it out with Claude too. Friday night for a warm-up, Saturday for Steps 1 through 5, Sunday for Steps 6 through 8. Plus one rule — no copy-paste, type everything by hand. I know from experience that the moment you copy and paste code, nothing sticks.
2. Day 0 — A JavaScript Warm-Up After a Long Time
Going back and forth between backend and frontend work, it had been quite a while since I'd typed plain JavaScript by hand. And these days I hand off nearly all of my code writing to Claude and Codex, so I figured even reading the code would give me trouble.
The original is from 2019, so it guards with && instead of optional chaining — that bugged me a little too. So on Friday night, before diving into the main course, I went back to basic syntax in warm-up mode.
let/constand arrow functions — Didact constantly reassigns globalletvariables likewipRootandcurrentRoot, so I needed a feel for that first- Rest parameters and spread — Step I's
createElementis basically built out of this one piece of syntax - Short-circuit evaluation (
&&,||) and truthy/falsy — the key to reading the Step VI code - Closures — "variables survive even after the outer function returns", all the way through building a get/set pair myself. I only vaguely sensed at this point that it was foreshadowing Step VIII
I had Claude pick out the basic syntax I'd absolutely need to know up front to get through the original effectively, and had it build HTML learning material for each concept. I opened the HTML file in the browser, opened the dev console, put the content on the left and typed into the console on the right as I worked through it.
The method was the same every time. Read the material, type out every bit of code by hand, and only move on once I could answer all the quiz questions at the end.
3. The Main Course — Steps 0 Through 8 by Hand
Saturday. I started by making an empty project with Vite. The first hurdle wasn't code, it was the environment. Modern build tools automatically transform JSX into react/jsx-runtime, but this article needs the classic approach that calls Didact.createElement directly. Switching the config over to the classic transform was lesson one.
The eight steps went roughly like this.
| Step | What | How hard it felt |
|---|---|---|
| 0–2 | Replacing 3 lines of React with vanilla JS, createElement and render | Warm-up |
| 3 | The problem with recursive rendering — main thread blocking → workLoop | Planting the problem |
| 4 | fiber — unrolling the tree into a linked list so it can be interrupted | First mountain |
| 5 | Separating the render phase from the commit phase | Over the hump |
| 6–8 | Reconciliation, function components, Hooks | Second mountain |
The original is well structured and explains things clearly, so the early part wasn't hard to follow.
Things started getting a bit harder from Step 4. If you try to answer "why unroll the tree into child/sibling/parent pointers?" by reading the code first, you're guaranteed to get lost. Walk a tree recursively and 'how far you've gotten' is trapped in the call stack, so you can't interrupt it. fiber is that call stack unrolled into object links. Only after drawing the picture first could I read the code.
That got me through Step 5 on Saturday, with a static UI on the screen. Steps 4 and 5 didn't click all at once, but typing the code by hand and tracing the execution flow in my head was enough to get there.
4. The Second Mountain — Using Claude to Learn
From Step 6 (Reconciliation) the difficulty changed gear. There isn't much code, but the three pointers — wipRoot, currentRoot, alternate — kept tangling up in my head. Even after reading the original twice, I was stuck at "I get 80% of it but not 100%".
So I changed my approach. Instead of asking Claude to explain the concept every single time, I asked it to build visualization-first learning material. Three requirements: put in diagrams generously, include an interactive simulator that lets me run the algorithm one step at a time, and make me predict the outcome at each step before revealing the answer.
This worked far better than I expected. Reading prose and predicting the result before hitting the simulator's "next" button are completely different cognitive activities. Wherever my prediction was wrong was exactly where my understanding had a hole. All I had to do was go back to the original and reread that part.
I've ported the core of that learning material into React components for this blog and embedded it below. If you got stuck on the last three steps like I did, give it a click.
4-1. Reconciliation — Remember, Compare, Apply
Didact through Step 5 can only 'add'. Call render twice and you get two copies of the UI stacked up. And if you fix that by wiping the screen and redrawing everything on every render, you're rebuilding the entire DOM each time — and any state the DOM was holding, like data the user typed in, disappears with it.
To fix this, you need to know the difference between what you're drawing this time and what you drew last time. So three things get added: remember (currentRoot, the last committed tree, plus alternate on each fiber pointing at the same slot in the previous generation), compare (reconcileChildren), and apply (commitWork, which reads effectTag).
The heart of the comparison is a single question:
const sameType =
  oldFiber &&
  element &&
  element.type == oldFiber.type
The answer to that question splits a fiber's fate three ways.
A table or a diagram makes it feel like you get it, but real understanding only comes from running the loop yourself. The simulator below runs reconcileChildren's while loop one iteration at a time. Check out why the loop keeps going in scenario B even after elements is exhausted (the || condition), and how in scenario C inserting a single item at the front of the list shifts every seat down (the price of position-based matching without keys).
Interactive — reconcileChildren simulator
Predict the next iteration's verdict (UPDATE / PLACEMENT / DELETION) first, then press the button.
old [h1, p, span] → new [h1, div, span, a]. Four iterations cover everything: an UPDATE, a simultaneous PLACEMENT + DELETION, and an iteration after oldFiber runs out.
elements — the new render's children array (advances by index →)
old fibers — the linked list from alternate.child (advances via .sibling →)
Before we start. index = 0, oldFiber = wipFiber.alternate.child. Predict the first iteration's verdict, then press "Run next iteration".
New fiber chain: —
deletions: [ ]
If I had to pick the one spot I struggled with longest, it's the deletions array. UPDATE and PLACEMENT create a new fiber that joins the new tree, so the commit runs into them naturally as it walks the tree. But DELETION only leaves a mark on the old fiber — it doesn't create a new one. The old fiber isn't linked anywhere in the new tree, so no matter how much you walk the new tree, you'll never run into the things to delete. Hence the need for a separate list holding only the deletion targets.
4-2. Function Components — Ghost Fibers and Two Kinds of Walking
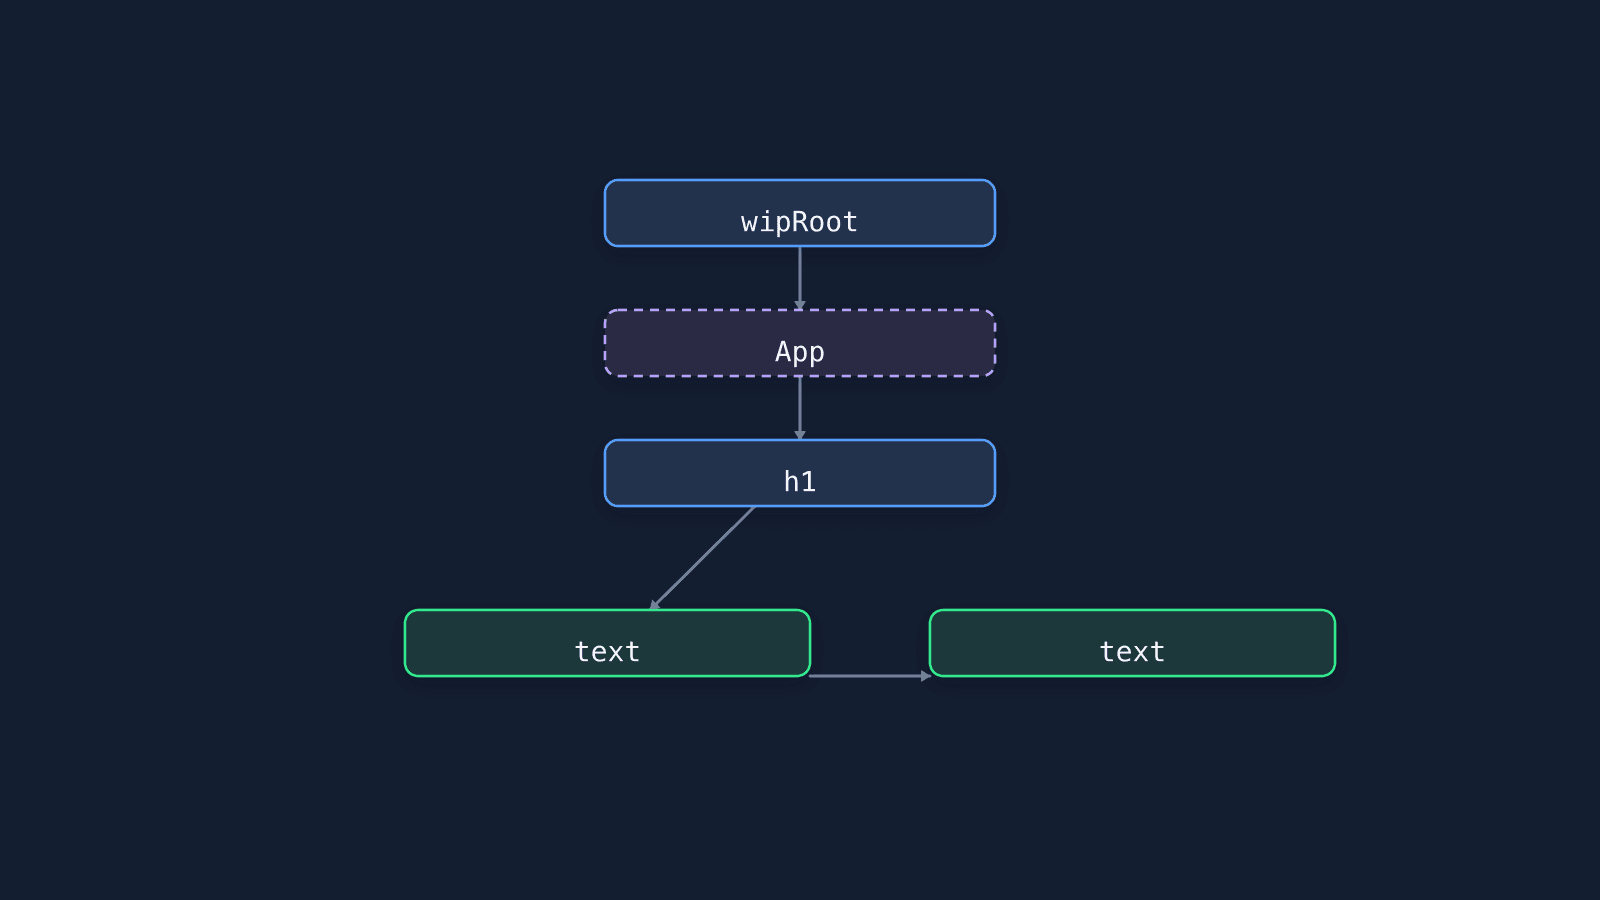
Step VII introduces elements whose type is a function rather than a string, like <App name="foo" />. The difference boils down to two things. The children aren't sitting in props.children — you have to run the function to get them (fiber.type(fiber.props) — that one line is what "rendering a component" actually is). And there's no DOM node corresponding to <App />.
The interesting problem comes from that second difference. The 1:1 correspondence between the fiber tree and the DOM tree breaks, creating a 'ghost layer' that exists only in the fiber tree.
Because of this ghost, the commit code has to learn to 'walk' in two directions. PLACEMENT goes up. To find where to attach h1, you have to climb past the dom-less ancestors with a while loop (components nest, so an if isn't enough). DELETION goes down. To remove <App />, you have to descend to the first descendant that has a dom. The directions are opposite but the principle is the same: a ghost has no substance in the DOM world, so both the target and the position of a DOM operation always come from the nearest real thing.
Interactive — <App /> mount stepper
5 render steps + 5 commit steps. Step through predicting which path each fiber takes — function or host — and when its dom gets created.
Before we start.
- Right after
Didact.render(<App name="foo" />, container)— workLoop has been processing fibers and is about to reach the App fiber (a function component). - Press "Next step" and predict which path each fiber takes: function or host.
Steps 6 and 7 are effectively this whole step. The App fiber does nothing during the commit and passes through transparently (it gets caught by the fiber.dom != null guard). The moment the while loop skips past the ghost and finds the container while committing h1 is when the code Step VII added actually starts doing its job.
4-3. Hooks — State Lives on the Fiber
The last step is useState. For a Counter component to work, three questions need answers. The component function runs again from the top on every render — so where does state live that lets it survive? You pass neither a name nor a key, so how does useState find its own state? And setState is just a function call — so how does it redraw the screen?
The answers, in order. State lives not on the function but in the fiber's hooks array. Its identity is call order — just an array index called hookIndex. And setState pulls exactly the same trick as render(): set a new wipRoot and trigger a re-render. I'd carried around the reason for "don't call hooks inside a conditional" as a memorized rule for so long — seeing it reduce to the single line hooks[hookIndex] was deflating, to say the least.
This was also the first time I properly understood that setState doesn't change state. All it does is book the work (push an action onto its own hook's queue) and pull the trigger (set a new wipRoot). The settling up happens inside the next render's useState.
This structure is batching. If several clicks land before the render starts, actions pile up in the queue and the render runs just once, settling them in order. In steps 8–9 of the stepper below you can see two clicks handled by a single render.
Interactive — useState stepper: from click to screen
10 steps: mount → click → re-render → batching back-to-back clicks. Predict each step's state and queue first.
previous gen (alternate)
—
gen 1 Counter fiber — in progress (wipRoot side)
hooks: [] — just cleared, waiting for the useState call
wipRoot: gen 1 (just set by render()) · currentRoot: null
Before we start.
- Right after
Didact.render(<Counter />, container)— workLoop is about to reach the Counter fiber (a function component). - Predict the state and the queue at each step before you move on.
Step 4 is my personal highlight. Right after the click — the action is in the queue, but both the state and the screen are unchanged. The answer to that old question, "why do I get the old value when I read state right after setState?", fits in this one screen.
setState doesn't simply set the state; it puts an action in the queue and schedules a re-render. Then, once the browser has an idle moment, workLoop picks that work up and runs it through the render phase and the commit phase, in that order. That's why state doesn't change right after setState but on the next render instead.
5. Reflections
Watching the reasons behind the rules reduce to code. That's the biggest thing I got out of this. Why hooks have to be called at the top level (because hookIndex is an array index), why lists need keys (because position-based matching reads an insertion at the front as everything shifting), why you shouldn't define a component inside a component (because it's a new function reference every render, so sameType is always false). Every React rule I'd been memorizing turned into "an implementation reason it couldn't be otherwise".
I learned something about studying with AI, too. This weekend I hardly ever asked the AI for an answer. Instead I had it recommend a learning path, plan things out with me, and — where I got stuck — build learning material that forced me to predict. I used AI as a textbook editor rather than an answer key, and this division of labor, which leaves the effort of typing by hand and predicting squarely with me, suited me well.
Of course, this 300-line Didact isn't the real React. It reconciles even unchanged subtrees, it has no keys, and its deletion commit has holes. The original's epilogue lays out how it differs from the real thing, and reading that list was a closing review session in itself.
Over two weekend days and about 8 hours total, I built a very simple version of React from scratch. If you've been curious about the internals of a tool you use every day, I recommend this course.
- Original article: Build your own React
- Study repository: didact-study